Python Programming Kickstart#
Install Python before working through this section, which will review some basics of Python if you have programmed in Python before, or introduce them if you are not already familiar with Python.
We will revisit many of the concepts in this kickstart later, in more depth. For now we want to get just enough Python programming to initiate your first projects.
Executing Python commands in IDLE#
Python commands (statements) may be executed immediately in a console, or stored in a program file (often called a script) for execution later. In this course we will use IDLE both to execute statements directly and to edit and execute program files. (Later we will explore additional ways to edit and execute Python programs.)
Once you have installed Python 3 on your computer, you should be able to start IDLE from the command line. It should look something like this:
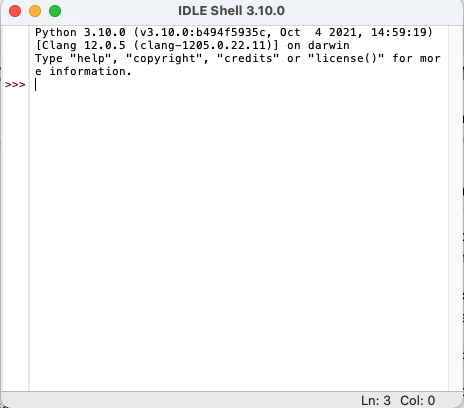
The >>> symbol is a prompt indicating that
the Python shell, or console, is ready to
receive a statement and execute it.
Try this by typing print("Hello!") on the
line with the prompt.
print("Hello")
Hello
What happens if you change “print” to “Print” or “PRINT”? Does this tell you something about the rules of the Python language?
Whenever you are curious about some rule or characteristic of the Python programming language, you should design and carry out micro-experiments to build understanding. As in a full-blown scientific experiment, you will get the most from a micro-experiment if you have a specific prediction based on a hypothesis about the language.
For example, your hypothesis might be “Python is
case-insensitive; ‘Print’ and ‘print’ should do the same thing.”
Your prediction would then be that Print("Hello") causes “Hello”
to be printed. Your experiment would disconfirm this prediction,
telling you that the hypothesis was incorrect: Python is case
sensitive. Performing little experiments as you work is much faster
than correcting a lot of code that was built on wrong assumptions!
Of course there are other ways you can learn details of Python language rules. You should already have bookmarked the Python library documentation in your browser. (If you haven’t, do it now!) Don’t attempt to read the whole library documentation from start to end. Instead, refer to it whenever you need to familiarize or re-familiarize yourself with some part of Python. You needn’t try to memorize anything beyond the absolute basics of Python syntax. Instead, look up what you need, as you need it. Memorization of the parts you use most will follow automatically.
Variables and Assignments#
A variable in Python is a named storage location. For example,
x could be a variable, and so could this_long_variable_name.
When we assign a value to a variable, we are storing a value in it.
If we write an assignment statement like x = 2 + 3, we are not
saying that x will always be equal to the value 2 + 3; rather
we are telling Python to evaluate 2 + 3 (producing the value 5)
and then store that value in the location called x. Some
programmers pronounce “=” as “gets” rather than “equals” to
emphasize that meaning and avoid confusion.
Sequences of assignment statements and other Python commands are executed one-by-one.
y = 5
x = y + 5
y = 25
x = x + 8
print(x)
18
Note in the little program above, storing the value 25 in y has
no effect on x, because we have already stored a value computed
from the prior value 5 that was in y when we executed
x = y + 5. If x = y + 5 was an algebra equation, we would have
created some permanent relationship between the values of x and
y. But it is not an equation. It just evaluates the then-current
value of the expression y + 5 and stores that value in x.
We can even use the current value of a variable to evaluate a new
value to be stored in the same variable, as we have in the assignment
statement x = x + 8.
If you find this even a little bit confusing, it may help to watch these assignment statements execute one by one in the excellent Python Tutor web application.
Basic types: int and str#
In our example, Python executed x = y + 5 by “evaluating” y + 5
before assigning the result to x. It is always the
right-hand side of the assignment (like y + 5) that is evaluated,
and only then is the result stored to the variable on the left-hand
side. We can’t write y + 5 = x, because y + 5 is not a variable.
(Try it to be sure … it won’t break your computer, but
the Python interpreter will print an error message.)
How does Python know how to “evaluate” the expression? How does it know what “+” means? The meaning of “+” actually depends on the kinds of value we are trying to add. Consider this:
pref = "The meaning of "
suff = "life, the universe, and everything"
phrase = pref + suff
print(phrase)
The meaning of life, the universe, and everything
While a value like 5 represents an integer, quoted text like
"The meaning of" is a string of characters. These are different
data types, that may be evaluated in different ways. In
Python, integers
are represented by the values of type int, and text is represented
by values of type str. Python has additional data types including
float (short for “floating point”) to represent real numbers and
bool (short for “Boolean”) to represent truth values, either
True or False.
Consider this little bit of code that looks almost like our previous example, but has a very different result:
y = "5"
x = y + "5"
y = 25
x = x + "8"
print(x)
558
Can you see the difference? When we put quotes around "5", we are
giving a value that is not an integer, but rather a string of
characters (in this case just one). While the meaning of “+” for
int values is integer addition, the meaning of “+” for str
values (strings of characters, representing text) is concatenation
(like gluing the strings together).
What happens if you try to mix them, like "x" + 5? (Don’t worry,
although nobody loves error messages, it won’t harm your computer to
try.)
Functions and Methods#
In addition to expressions with operations like “+” for addition,
operations are sometimes given as function calls like len("something")
for the length of a str value or max(5, 7) to choose the larger
of two int values. Some types also have methods, which are
similar but written a little differently, e.g.,
s = "                island                 "
print(s)
print(len(s))      # calls function len on string s to find its length
t = s.strip()      # s.strip() calls method strip to remove whitespace
print(t)
print(len(t))
                island
39
island
6
It’s annoying that you have to remember when to use the
style of a function call like len(s) and when to use the style
of a method call like s.strip(). You’ll probably mix them up
sometimes (I still do, after years of Python programming), but
it’s an easy bug to fix when Python complains.
Lists#
Python also provides some types for collections of different values. We will explore and use several of them.
The collections we will use most are lists, which are sequences of
other values. For example, [1, 2, "buckle my shoe"] is a list of
three elements. The first two elements are int (integer) objects and
the third is a str (string) object. The elements of
a list may also be lists (we call this nesting, like matryoshka
dolls).

Fig. 1 Lists within lists are “nested”, like nested dolls. (Image by user Fanghong in Mediawiki commons, used under CC by SA license.)#
We can nest lists as deeply as we like.
[["corvids", ["crow", "raven"]], ["primates", ["lemur", "human"]]]
denotes a list with two elements. The first element of that list is a
list with two elements, and the first element of that list is a
string (“corvids”).
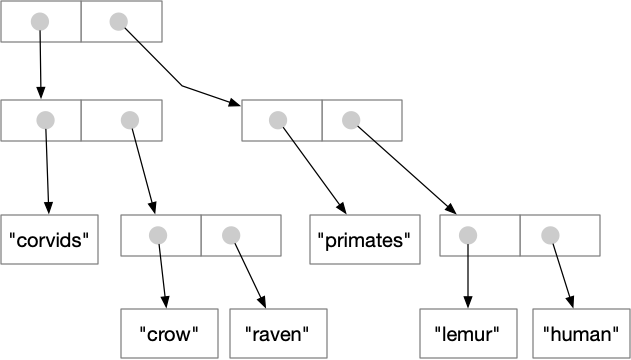
Fig. 2 List elements can be references to other lists, as well as other
kinds of object, as illustrated by this representation of
[["corvids", ["crow", "raven"]], ["primates", ["lemur", "human"]]]#
In addition to actual lists, we will use some other kinds of value that are very similar. For example, several of our projects will treat text files almost as if they were lists of strings, except that we have to “open” them before accessing each line of text as a string.
Decisions: The “if” statement#
Python provides an if
construct for choosing between possible actions. We’ll illustrate
it with a very simple example:
x = 17
y = 30
if x > y:
    x_y_max = x
else:
    x_y_max = y
print(x_y_max)
30
We can nest if statements within other if statements:
x = 17
y = 30
z = 15
if x > y:
    if x > z:
      biggest = x
    else:
      biggest = z
else:
    if y > z:
      biggest = y
    else:
      biggest = z
print(biggest)
30
Sometimes we can write simpler, clearer code by using elif instead of
nesting if statements. Combining comparisons with and and or
can also help.
x = 17
y = 30
z = 15
if x > y and x > z:
  biggest = x
elif y > x and y > z:
  biggest = y
else:
  biggest = z
print(biggest)
30
Note
We have chosen an over-simplified example to illustrate if and
elif. An even better way to find the largest of three values
would be to use Python’s built-in max function.
Recall that the symbol = is used for assignment. So how can we make
an if statement that checks whether two values are equal? In
Python we use == to check equality. Some other comparisons
use pairs of characters: >= for “at least” or “greater or equal to”
and <= for “at most” or “less than or equal to”. For example:
if x == y:
    print("They are the same")
elif x >= y:
    print("x must be larger, since they're not equal")
else:
    print("y must be larger")
y must be larger
Using = when you meant to use == for a comparison is a
common typo. Fortunately Python usually catches it and produces
an error message:
if x = y:       # OOPS!
    print("This will never happen.  Huh uh.")
  Cell In[10], line 1
    if x = y:       # OOPS!
       ^
SyntaxError: invalid syntax. Maybe you meant '==' or ':=' instead of '='?
Repetition (looping): for#
Often we need to repeat the same action with different values. Most
commonly we will want to perform an action with each element of a
collection (e.g., a list object). Python lets us do
this with a for loop, like this:
animals = ["elephant", "tapir", "manatee"]
for pet in animals:
    print(pet)
elephant
tapir
manatee
Typically, when we loop through a collection of objects, we accumulate some information about the collection as a whole. Suppose, for example, we wanted to determine the number of characters (letters) in all the animal names together. We would initialize a total just before the loop, then accumulate values within the loop.
animals = ["elephant", "tapir", "manatee"]
total_length = 0
for pet in animals:
    total_length = total_length + len(pet)
print(total_length)
20
This is such a common pattern that it has a name, the accumulator pattern.
We will see many variations on for loops and on the accumulator
pattern in projects. There are other kinds of loops in Python (e.g.,
a while loop repeats as long as some condition is true), but for
loops are most common.
User-defined functions#
Above we looked at calling built-in functions like len and
print. You are not limited to using the built-in functions
provided with Python — you can also write your own. We will
spend a lot of time designing, writing, testing, and debugging
functions in this course, starting with our very first project.
You may define a new function once and call it several times in different parts of your code. In that way a function can make your code shorter. More fundamentally, a well-designed and well-written function can make your code easier to read, understand, and maintain, by organizing complex logic into brain-size chunks.
You create a new function with the keyword def, short for “define”.
Give it a concise, meaningful name, and then describe the
arguments that the function will use (the input of the function)
and the type of result, if any, that it will return. For example,
if Python did not already have a max function for integers, we might
create one like this:
def my_max(x: int, y: int) -> int:
    """Returns x or y, whichever is larger"""
    if x >= y:
        return x
    else:
        return y
Note that we indicate the expected type of each of
the arguments x and y (both int in this case),
as well as the type of
value that my_max will return (also int). The first line
or lines in the indented body of the function is a
docstring comment explaining the purpose of the function
(but not how it works). In our first project we will also
see how to add automated tests to a longer docstring comment.
x and y in “def my_max(x: int, y: int)” are called formal
arguments.
You can think of the variables x and y
as placeholders for values that we will “pass in”
when we call my_max, like this:
a = 17
b = 32
ab_max = my_max(a, b)
print(ab_max)
In this example, a and b are called the actual arguments,
corresponding to the formal arguments x and y. The
When my_max is called with my_max(a, b), we pass the
values of a and b, setting the x value in my_max to
the value of a and setting the y value in my_max to
the value of b.
There is much more to be said about functions, about passing actual values and binding them to formal arguments, and especially about designing functions that help us think clearly about our programs. We will build on these basics in the next few projects and beyond.
Start building!#
The little bits above are only a small fraction of the Python programming language. We could go on much longer, but it is easier to remember information that you have actually used. We will therefore jump straight into building a project. After establishing that concrete anchor to your knowledge of programming in Python, we can return to fill in additional details and take a deeper look at variables, types, control structures (sequencing, decisions, and loops), and the problem-solving processes we use in programming.
Keep reading 𝄇#
If some of this chapter is a little confusing, read it again. If it doesn’t seem confusing yet, start on the project, then come back when the project confuses you to re-read relevant parts, and/or give it one more read-through when you finish the project. Really. These chapters are short so that you can read them again and again, and especially so that you can move back and forth between project and text. Don’t expect to remember everything in a chapter and then recall it as you build the project. Rather, a first reading will get you far enough to get started on the project, then the project will help you get more from a second reading of each chapter.
Project 1#
Our first project is an anagram solver. You will find it on github.

Fig. 3 Download the project as a zip archive from github.#
Decompress the project archive into a directory (“folder”) and move
the whole thing to a directory in which you keep all the projects
for this class. Inside the directory for this project, you will
find a directory called “docs”, and inside that you will find
“HOWTO.md” with instructions on completing the assignment. Those
instructions are in a form called “markdown”. If you are familiar
with the markdown format and already have a markdown reader tool
installed, you can read the instructions that way. Otherwise you
may prefer to read on github by clicking
through on docs and then HOWTO.md to reach
the formatted version.